Clean Your personal Carpets or Employ a specialist?, Corona, CA

You might be thinking that you are going to spend less on carpet cleaning and possibly hire a equipment or get your own private. The issue is, do you would like to offer along with the labor and mess, and can you really spend less? One more thing to consider is what the machine could do on your costly carpets.


Most do-it-yourself carpet cleaning equipment, no matter if owned or rented, are large and hard to use. Just after your entire effort, success are generally not that excellent or long lasting. Your carpet might glimpse thoroughly clean initially, but a week or two later on, old places are back and it by now must be cleaned yet again. There may be also the issue of wholly eliminating drinking water remaining in your carpet because rental and residential models are not incredibly helpful extractors. Even a steam cleaning expert is not able to eliminate each of the h2o. Just after just 3 several hours, mold and mildew start to expand in damp carpets, making mould spores that circulate through the air.


In addition, the low excellent (yet high priced) carpet cleaning substances that are suggested to be used along with the machines might be a difficulty. Their severe and sometimes toxic detergents go away a sticky residue that attracts dirt, causing carpets to soil speedier. These substances may also shorten the existence of your carpets and negatively have an affect on your wellbeing.

To shield your carpets and maintain them searching new, hiring a professional carpet cleaner would make feeling. For most effective results, glimpse for the business which offers non-toxic, lower moisture, detergent-free cleansing which will prolong, not shorten, the lifetime within your carpet. Pick a procedure which is proposed by carpet suppliers as some, especially steam or bonnet cleansing, can void carpet warranties. Also search for carpet cleaners utilizing organic and natural products which are risk-free for your youngsters, pets, as well as natural environment. When your carpet is cleaned properly, it’ll continue to be cleaner and past more time, saving you moneyas well as hard work of cleaning your own personal.

Truck Mounted Carpet Cleaners: What would be the Advantages?

When carpets are cleaned, some kind of equipment will inevitably should be applied to achieve the preferred finish goals, but there’s not only a single option; in actual fact you will find lots of. A truck mounted carpet cleaner is a single such alternative that firms specializing in carpet cleaning in riverside County, CA make use of to restore the look of their clients’ carpets and prolong their lifespan. Because the name rather suggests, this machine will usually be attached to either the floor in the van itself or to a trailer, and these cleaning systems commonly have hot water running via them to be able to “steam clean” the carpet. Concealed inside the firm’s van, when you speak to any contractor in Boulder that specializes inside the cleaning of carpets, oriental rugs or upholstery, they’ll likely tell you that a truck mounted method provides lots of advantages more than other equipment intended for these purposes.

The Distinctive Kinds of Truck Mounted Carpet Cleaners

In general there are actually a few various kinds of truck mounted carpet cleaning systems – slide-in truck mounted cleaners and van powered carpet cleaners. The first choice attributes its own engine and for that reason powers itself, and is sited inside its personal frame, which can be then bolted onto the floor from the van. The principle advantage with this kind of technique is that it may be made use of inside a wide selection of distinct automobiles and may even be transferred from a single to another. Van powered systems truly utilize the vehicle’s engine to energy the unit and are usually additional compact in design and style so take up less space.

How To: Clean an Area Rug, Corona CA

For many of us, area rugs are a significant investment in decor. They warm up and add color to our rooms. They provide soft places for game playing, movie watching, and slumber partying.

But in order for rugs to last for years, they need to be maintained. And a big part of that maintenance is regular cleaning. Sure, you can send out a rug to be cleaned off-site by professionals—but it ain’t cheap. If you’re willing to put in some time and energy, however, it’s eminently possible to do a good job of cleaning your own rugs at home.

As an added benefit, you’ll have peace of mind knowing exactly what types of cleaners are being used on your rugs—knowledge that’s increasingly important to many, especially those with young children or chemical sensitivities.

MATERIALS AND TOOLS
Vacuum
Rubber gloves (optional)
Rug shampoo or mild dish detergent
Bucket
Sponge
Soft-bristled brush
Squeegee
– Water—lots and lots of water (i.e., get your hose out!)

DIRECTIONS

How to Clean a Rug - Vacuum

Photo: carpetencyclopedia.com

1. Prepare the Rug. First, thoroughly vacuum the rug on both sides to remove any loose dirt.

2. Test for Colorfastness. Follow the mixing instructions on a store-bought rug cleaner/shampoo, or add a couple of capfuls of mild dish detergent to a bucket of warm water. Do not use hot water, as it may shrink fibers or fade color. Test the solution on a small corner of the rug to make sure it doesn’t make the colors run. If it doesn’t, proceed to the next step.

Related: Cleaning Green: Eco-Friendly Home Cleaning Products

How to Clean a Rug - Soapy Water

Photo: carpetcleaninglosangeles.net

3. Wash. Using a sponge or brush, work a lather of shampoo or detergent deep into the rug. Allow the solution to sit on the rug and work for several minutes before rinsing.

4. Rinse. Thoroughly rinse the rug with a garden hose, making sure the water is clear of soap suds before you finish.

5. Remove Excess Water. Squeeze as much water out of the rug as you can with your squeegee, being careful to work only in the direction of the rug’s nap.

6. Dry. Lay the rug flat to dry. Once the top side is dry, flip it over so the bottom can dry as well.

7. Loosen Fibers. Use a vacuum or soft-bristled brush to loosen up the fibers of the rug, as they may have compacted during the washing/drying process. Return your rug to the room and enjoy!

It’s important to wash rugs only when they’re dirty. To test whether or not your rug needs to be cleaned, pick up a corner of the rug and let it flop down onto the floor. If a little cloud of dust floats up, a cleaning is in order. Also, wash rugs when they are visibly dingy or have a noticeable odor.

With regular maintenance and cleaning, your rugs will serve your family and home for many years, playing host to scores of game tourneys, TV marathons, and fireside snuggles.

Proper Steps To Clean Carpets, Corona CA

This is part two of a three-part article.

Regardless of what carpet cleaning method a facility uses, the “more is better” mindset is still prevalent in many custodial departments and can be detrimental to both the appearance and longevity of the carpet. Excess cleaning chemicals can exacerbate re-soiling, while oversaturating the carpet can causes odors and even mold issues.

“In the past the thinking has been ‘more is better’ — and I’ve been guilty of this, too,” admits McGarvey. “But when we load these carpets up with chemicals, we tend to see resoiling happening more quickly, and it degrades the appearance of the carpet a lot sooner than it should.”

In addition to following equipment manufacturer’s instructions for chemical usage, consultants advise users to rinse chemicals from the carpet thoroughly following hot water extraction, as well as low moisture options — particularly when applying the cleaning product to the carpet via the machine’s tank. The same holds true for interim cleaning methods such as encapsulation.

“When you use an encapsulation system, it’s important to remove the compound because, if you don’t, it will take the dirt off your shoes and leave it in the carpet,” says Bigger.

Just as chemicals need to be removed thoroughly from the carpet after cleaning, custodians need to recover as much water as possible from the carpet and avoid over-wetting it — a mistake that often occurs when dealing with high-traffic areas or stubborn stains.

“Make sure that you get the carpet dry, preferably in four to six hours,” says McGarvey. “Beyond 24 hours, you run the risk of mold growing.”

Air movement and carpet blowers can help to speed up the process, but staff should also check that carpet equipment is in good working order. A clogged vacuum, for instance, may not recover water properly, resulting in longer dry times. Jets should also be flushed on a regular basis to ensure that they don’t get clogged.

“A lot of times, custodians turn on the machine and hear the vacuum or pump and assume it’s working,” says Griffin. “But just because it’s making noise doesn’t mean it’s working properly. You want to inspect it regularly to make sure you’re getting proper flow of the jets and proper suction of the vacuum.”

In addition, tanks should be emptied and rinsed after each use and allowed to air dry to avoid odor problems caused by bacterial growth.

There are plenty of things that can go wrong when it comes to carpet cleaning, but perhaps one of the surest ways to get off on the wrong foot is making the assumption that carpet cleaning is a straightforward service anyone can deliver with little or no training. In fact, Bill Yeadon, training director of Jon-Don, a Roselle, Illinois-based distributor, describes this belief as “the most glaring problem” behind many carpet cleaning mistakes.

“Contract cleaning isn’t a difficult process, but it does require following simple principles and processes,” he says. “One method or one chemical doesn’t take care of all situations.”

A properly trained and educated professional will assess each floor, says Yeadon, selecting the right processes and chemistry based on the needs of that specific area.

In the past, it was common to deploy a more macro strategy, treating all the carpeted surfaces in a building as equal, therefore requiring the same soil removal/cleaning processes and frequency, says Bill Griffin, president of Cleaning Consultant Service, Inc., Seattle. But he says taking a micro perspective is more effective and cost-efficient, since each carpeted surface faces its own set of unique, use-based issues that should dictate the approach.

Inspecting the carpet before cleaning is an important first step. Look for spots, open seams, pulled yarns, stains, damage and severe texture change to the carpeting, says Griffin.

“These problem areas, conditions and issues should be documented in writing and communicated to the supervisor or client before cleaning begins,” he says. “Set the expectations in the customer’s mind about what you can and cannot do. If you inspect, document and communicate ahead of time, you can avoid 95 percent of the problems you might have with that supervisor or client.”

And then, says Griffin, building service contractors can figure out which cleaning process will deliver the best results with the least chance of a negative impact

What are some of the mistakes contributing to these negative impacts? One of the most critical carpet problems is a lack of proper vacuuming, says Yeadon. This oversight can prove especially detrimental when it comes to dry soil removal, since this matter accounts for up to 90 percent of the soil found in carpeting. Dry soil can easily be removed by vacuuming. Skipping this step will only create more work for janitors.

“Once you use water on the carpet, any remaining dry soil becomes mud and is harder to remove,” says Joel Craddock, president of Doc’s Facilities Solutions, Inc., and CEO of Doc’s Facilities Consulting, Inc., both in Rochester, New York. “Additionally, it can potentially build up in the carpet if not fully removed. Companies that skip this step, or clients that reduce the vacuuming schedule, can expect that the carpet won’t stay as clean as a properly maintained carpet.”

Giving vacuuming short shrift won’t make the building service contractor shine either, says Yeadon.

“When vacuuming isn’t done properly, the synthetic fibers can be scratched and abraded, permanently damaging the carpet’s appearance,” he says. “This can’t be fixed and makes it look as if the technician is doing a poor job.”

The problems don’t stop with dry soil removal. There are plenty of other mistakes to be made during more intensive cleaning. One common problem is a janitor using too much soap and not rinsing enough, says Quintis Millsaps, president and CEO of Q’s Cleaning Services, Inc., a South Holland, Illinois-based BSC.

“This can impact the carpeting by constantly attracting soil to the soap residue left in the carpet, which may cause it to look dull,” says Millsaps. “These mistakes can be costly. If a carpet is improperly cleaned it can void the warranty and the contractor may have to replace it.”

The overuse of wet-cleaning, deep-extraction processes can lead to trouble, says Griffin. When done too often, the carpet’s backing can be negatively affected, since the excessive moisture can impact the adhesive on some carpets, causing it to delaminate. Too much moisture can also lead to mold and mildew in the surrounding environment. Additionally, overly wet carpet may result in slips and falls.

Instead of always extracting carpets, low-moisture processes can effectively clean carpets. But these shouldn’t be overused either.

“People need to remember these systems are a surface cleaning and a maintenance process versus a deep cleaning,” says Griffin. “Consequently, the overuse of low-moisture processes can leave a residue buildup over time, which can end up compromising the appearance of the carpet and its lifespan.”

One low-moisture process is encapsulation, which uses a specific kind of detergent to clean. Encapsulation is primarily deployed as an interim cleaning method, says Craddock. One positive is that this process requires very little water compared to typical hot-water extraction methods.

Basically, the detergent encloses the soil in a brittle crystal as the carpeting dries. Craddock says it can take up to 24 hours after the process starts to fully attract and crystallize the dirt, although less time may be required. Once the carpeting dries, vacuuming removes these crystals, taking the soil and dirt with it.

But several factors can undermine the results. One of these, says Griffin, is waiting too long to do the process, trying to clean carpeting that is overly soiled. Not thoroughly vacuuming and removing as much dry soil as possible before beginning encapsulation is another issue.

“Encapsulation can’t dissolve sand and dry soil,” says Griffin. “You want to get the dry stuff out as much as possible, because you want to focus the chemical’s energy on the sticky stuff it can dissolve.”

Another mistake is using encapsulation on the wrong kind of soils. For example, this process may not prove as effective on carpeting typically found in restaurants, movie theaters or factories where there tends to be high levels of greasy soils.

Thoroughly vacuuming after encapsulation is important, says Millsaps, explaining the objective is to remove the dried crystals before they have contact with any moisture, which could cause them to lose their efficacy.

Equipment plays an integral role in the success or failure of the encapsulation process. It’s most effective to use a pile-lift vacuum on the traffic lanes before and after encapsulation, says Griffin. A frequent recommendation is using a dual-motor upright vacuum with a HEPA filter and a paper bag liner to fully remove the dry carpet cleaner, adds Craddock.

“Many companies don’t always have the correct equipment to remove the dry compounds, which can leave residual crystals behind,” says Craddock. “This can cause some minor damage to the fibers if not fully removed over time.”

Recommendations For Cleaning And Drying Carpets, Corona CA

Proper equipment, adequate air movement and a measure of patience can speed up the drying process

It’s no secret carpets require regularly scheduled cleaning to maintain their appearance and prolong their lifespan. But sometimes carpet cleaning programs overlook the importance of drying carpets after cleaning them. And carpets that remain damp for too long can attract more dirt, harbor unpleasant odors, or — even worse — create a breeding ground for mold.

“Drying the carpet is as important as cleaning the carpet,” says John Poole, a consultant with the American Institute of Cleaning Science in Atlanta, Georgia. “If you leave the carpet wet, you’ll set off mold and mildew, so it’s critical to clean and dry it thoroughly.”

Toward this end, the first step is to identify what type of carpet the staff is cleaning.

“You need to understand that carpet because the wrong chemical or system can damage it,” says Poole. To avoid a possible violation of the carpet warranty, he suggests calling the manufacturer to determine the recommended maintenance schedule.

Soil level and climate will also factor into how the carpet is cleaned and dried. Some carpet care experts advocate hot water extraction for heavily soiled areas or deep cleanings, with low-moisture methods, such as encapsulation, used on an interim basis to maintain the carpet.

“Step one is to extract the maximum moisture using a machine vetted by The Carpet and Rug Institute (CRI),” says Allen Rathey, president of The Healthy Facilities Institute, Boise, Idaho. “Carpet extraction equipment awarded the CRI Seal of Approval is designed to remove most of the moisture that results from a wet cleaning process.”

While low-moisture carpet cleaning procedures will result in dry times that are faster than extraction, the techniques and equipment used to speed up the drying process are essentially the same.

Air Power

Once carpets have been cleaned, the best way to speed up the drying process is to introduce and circulate air.

“All moisture has to wick,” notes Bill Yeadon, senior instructor at Jon-Don Inc., Roselle, Illinois. “We can make wicking go faster anytime we move air across the surface of the carpet.”

This can be as simple as opening a window or a door — if weather permits.

“Ventilate with fresh air when the outdoor air is dryer than indoors, and when building security systems or other protocols permit,” says Rathey. “Directing outdoor air into and out of the structure will enable faster drying.”

Additionally, the use of air movers and HVAC systems can cut dry times significantly — especially when used in tandem.

“Air conditioning is probably the best dehumidifier we have, because its purpose is to pull the moisture out of the air,” says Yeadon.

When cleaning carpets in the evening hours, Poole recommends leaving fans and HVAC on overnight whenever possible. And those times when it’s not hot enough to turn on the air conditioning or cold enough to turn on the heat, or when outdoor air is not an option, custodians may have to rely solely on air movers.

“If it has been raining and/or the outdoor ambient air is damp, or if ventilation is not appropriate, fans should be used to direct drier air over and through the carpet,” notes Rathey. “Also, fans suffice for situations when carpet is properly extracted and interior relative humidity is low enough that fan-drying — perhaps coupled with air conditioning or central heat and (with care) space heaters — will dry the carpet within several hours.”

According to Rathey, properly cleaned and extracted carpets should dry within a few hours. Even in the most extreme situations, carpets should be dry within 12 to 24 hours. It just comes down to the number of fans and their placement, which depend on ambient air conditions and the fan’s capacity.

As a rule of thumb, when drying carpet in a hallway, Poole recommends placing air movers on opposite ends of the area immediately after extraction. For a room measuring approximately 25 by 25 feet, Yeadon suggests two to three standard fans, pointing toward the middle of the room, or one fan that pushes air out in a 360-degree circle positioned in the center of the room.

Carpet Cleaning Necessitates-Heavy-duty-Vacuums-Corona CA

Part three of this three-part article looks at other advantages of commercial vacuum cleaners.

End users often will scoff at the price of a commercial vacuum as compared to a consumer vacuum. However, the features on commercial vacuums far outweigh the benefits of consumer machines.

In order to withstand the wear and tear of everyday use, commercial vacuums are designed with durability in mind.

“Commercial vacuums are generally heavier, more heavy-duty and can take more of a beating,” says Griffin. “People are in a bigger hurry in a commercial setting. It’s not as delicate a setting as you’re going to find in a residential market, so they tend to be a little harder on the equipment. They bang into things more. They drop it around, beat it around, throw it around.”

Manufacturers of well-built commercial vacuum cleaners also take into account the amount of time the unit will be in use. An example would be the on/off switch. A good commercial vacuum is built with the knowledge that the switch will be turned on and off as many as 50 times a day, five days a week. A vacuum built for consumer use may only be turned on and off 10 times in a week.

Motors in commercial vacuums are manufactured for more cycles and are meant to be run for extended periods of time when cleaning large spaces. Some commercial machines are even equipped with dual motors — one for the vacuuming, and the other for the agitator brush, lessening the workload for one motor and extending its life.

Another major benefit commercial vacuums have over their consumer counterparts is air flow.

“Commercial units have much higher air flow, which means they pull more soil out of the carpet,” says Smith. “As you’re running it across the carpet, you’re agitating it, you’re pulling that dirt up out of there.”

Filtration is another area where commercial vacuums best consumer vacuums. Commercial vacuums often go through rigorous certification processes to test their filters, ensure they meet the needs of allergy-free environments such as hospitals, remove 99.99 percent of unwanted material from a facility, and ensure that they do not disperse particles into the air.

“With commercial vacs, that dirt is caught in the bag and it’s kept in the bag,” says Smith. “A lot of the cheap vacs exhaust all that dirt right back out into the room. So if you need to have a HEPA filtration, you need to have high-particulate filtering that is available in commercial units.”

Other notable features on commercial vacuums: they have longer cords, weigh less, have larger-capacity filter bags that enable end users to vacuum longer without stopping to empty the bag or container, and have tool kits used for high vacuuming or high dusting — all major productivity enhancers for professional end users.

Cords on commercial machines run 50 feet in length, 30 feet longer than standard consumer machines, so it decreases the need for the end user to plug in and unplug the machine numerous times in a large area.

Handle weight on commercial machines is also a key productivity feature.

“A lot of times, handle weight is a big deal,” says Smith. “Commercial units are designed for someone to use it for longer periods at a time, so manufacturers will design them so that the handle weight isn’t as heavy and you don’t have as much fatigue on the worker.”

Although commercial vacuums are built to outlast their consumer cousins, proper maintenance still should to be taken into consideration.

“It’s just like buying a car. You can buy a $30,000 or $40,000 car, but if you don’t take care of it, it’s a junker in three years,” says Smith. “If you spend the money [on a commercial vacuum], you maintain it, you take care of it, you train your workers on how to use it, it will last a long, long time and give great service. Very few times do any of these units ever just fail. Parts typically will wear out over a period of time, but they don’t just fail.” –

Area Rug Cleaning – Basic Rug Care, Corona, CA

Rug care is determined by size, construction, and material. Care for large-size area rugs as you would wall-to-wall carpet.

Vacuum large rugs to remove dirt. As with carpet, the most important thing you can do for larger area rugs is to vacuum them regularly. If a rug is reversible, vacuum both sides. This removes grit and grime that can wear out your rug prematurely. Take care to not vacuum the fringe of your rug.

Brush out pet hair. A vacuum will sometimes leave pet hair behind. Use a stiff brush to remove the hair, brushing in the direction of the nap of the rug.

Turn rugs every year. Foot traffic and sun can put extra stress on area rugs. Turn them once or twice a year to even out the wear.

Shake small area rugs. If the rug is small enough, you can take it outside and shake it or beat it vigorously to remove dirt and grit. Some areas have ordinances about shaking rugs outdoors, so check your local codes.

Cleaning Special Types of Rugs

Special types of rugs require special cleaning care. Keeping care tags on the rug or in a file can save you from costly mistakes. Follow these tips for taking care of specialty rugs.

  • Woven or braided rugs: Check rugs for stitching breaks before and after cleaning. Check labels to determine whether small braided rugs are washable. If they are, place them in a zippered pillowcase or mesh laundry bag. Wash in cool water on a gentle cycle, rinsing thoroughly. Tumble dry on a low setting. Place large braided rugs on a vinyl or concrete floor or place an old blanket beneath them. Sponge commercial carpet-cleaning foam over the surface and rub it in according to the product directions. Finish by rinsing or vacuuming. Dry thoroughly before replacing the rug on the floor.
  • Handmade, hand-knotted, antique, and Oriental rugs: Vacuum a new Oriental rug as you would carpet and wool area rugs. Use special care with delicate vintage or antique rugs. Protect them from the vacuum by placing a piece of nylon screen over the rug and weighting it down with books or bricks. Vacuum over the screen. Or, tie a piece of nylon mesh over the vacuum attachment and change the mesh frequently as dirt accumulates. Have these rugs professionally cleaned once a year. Rotate rugs to ensure even wear; direct exposure to sun will cause fading.
    Note: When buying antique rugs, learn as much as you can from the seller about the rug’s fiber content and construction. Ask for care tips.
  • Coir, sisal, rush, and grass rugs: Rugs made from these natural fibers feature an open weave that allows dirt to sift through to the floor beneath. Vacuum frequently, removing the rug occasionally to vacuum the floor, as well. Many of these rugs are reversible; if so, flip every time you vacuum for even wear.
    To clean stains or discolorations on a room-size natural-fiber rug, leave it in place. Protect the floor beneath it with a plastic drop cloth and towel. Scrub the stains with a soft brush dipped in soapy water. Rinse with clear water. Place a towel over the wet area. Blot the cleaned spot as dry as possible. Use a portable fan or hair dryer to speed drying. Move small rugs to a protected table or counter to clean. Water weakens the fibers, so work quickly and dry thoroughly to extend the life of these rugs.
    Some natural-fiber rugs are constructed in squares that are sewn together. Buy a few extra squares or a smaller size of the same rug. If a rug square becomes irrevocably stained, clip the threads that hold it in place and replace with a new square. Hand-stitch it in place with heavy-duty carpet thread.
  • Fur, sheepskin, and hair-on hides: Shake unscented talcum powder on fur, sheepskin, and hair-on hide rugs and leave for several hours. Brush the talcum powder through the hair, then shake it out. Repeat this process several times, depending on the length of the fur.
    To clean the back of such a rug, use a clean cotton cloth dipped in lukewarm soapy water. Wipe off any dirt or spills. Rinse with a cloth dipped in clean water and allow to dry completely before putting back in place.

About Deep Cleaning

Washing and drying small rugs. Consult care labels for small rugs to determine whether they should be dry-cleaned, spot-cleaned, or laundered. A dry-cleaning-only label might indicate that a rug is not colorfast. Test before spot-cleaning.

When you determine that a rug is washable, machine-wash it on the delicate cycle. To reduce the risk of tangling long fringe, divide the fringe into several hanks and wrap each one with white string. Place the rug in a mesh laundry bag or zippered pillowcase to protect it from the agitator, and wash in cold water on the gentle cycle.

Hang wet rugs over a clothes-drying rack, a slatted picnic table, or several bricks stacked on a porch, patio, or breezeway. Hanging a wet rug over a single clothesline will distort the shape of the rug as it dries. Small rugs made from synthetic fibers similar to carpeting can be laid to dry on a small worktable or counter that is protected by a drop cloth, old sheets, or towels.

Area rugs will benefit from a deep cleaning every 12″ -18 months. When using commercial cleaning products for the first time, test a small area of the rug to ensure that it is colorfast and not otherwise damaged by the product. To thoroughly clean a large rug, place it on a vinyl or concrete surface and apply carpet-cleaning foam and rub in according to directions. Finish by rinsing or vacuuming. Make sure the rug is dry before replacing it.

Dry-cleaning might also be an option for small- to mid-size rugs — check the labels for care instructions.

Stain-Removal Guide for Rugs

Time is of the essence when your rug becomes stained. Remember to blot — not rub — the stain and remove moisture from spills as quickly as possible.

  • Alcohol and soft drinks: Use a solution of 1 teaspoon liquid dish detergent, 1 quart of warm water, and 1/4 teaspoon of white vinegar. Apply to the stain, rinse, then blot dry.
  • Coffee or tea: Using the detergent mix above, apply to stain, rinse, and blot. If a stain remains, use a commercial spot carpet cleaner.
  • Fat-based stains: For foods such as butter, margarine, or gravy, use a dry-solvent spot carpet cleaner.
  • Gum: Peel off what you can, then put ice cubes in a plastic bag and harden the gum, scraping the gum off with a spoon or dull knife. Vacuum and use a dry-solvent spot cleaner if needed.
  • Paint: For acrylic and latex paint, while the stain is still wet, spot-clean with the detergent solution. If color remains, dab with rubbing alcohol. For oil-base paint, sponge with odorless mineral spirits, being careful not to soak through to the backing.
  • Tomato sauce: Sponge with cool water, dab with detergent solution or a citrus-oxygen cleaner. Rinse with a solution of 1 cup white vinegar and 2 cups of water and blot until dry.
  • Urine, feces, and vomit: Apply detergent solution or a citrus-oxygen cleaner, rinse, and blot until dry.
  • Melted wax: Use the same treatment as gum, hardening it with ice cubes in a plastic bag and scraping. Dampen a clean white cloth or cotton ball with rubbing alcohol and blot to remove any remaining wax.

You’ll be surprised to learn how much dirt vacuums miss — and how simple the best cleaning methods really are.

The pitch was simple. In the 1950s, a vacuum salesman would come to the door, spill dirt on the carpet, and ask the lady of the house to clean it with her machine. Then he would load a fresh bag into his model, run it over the “clean” carpet, and open the bag to reveal what it had picked up. Frequently that was all he needed to close the deal. Had the salesman reversed the order, however, using his machine first, the results might have been the same. Often the problem wasn’t the old vacuum. It was the fact that once dirt goes into carpet, it doesn’t easily come out.

Keeping Clean
Limit how much dirt gets into carpets in the first place. Declare a shoes-off rule, or place sturdy doormats at all entries.

Frequent vacuuming is the only way to keep grit from becoming embedded. Having a vacuum that’s easy to use is crucial. Spend the bulk of cleaning time where dirt collects: a dozen passes of the vacuum within 4 feet of outside doors, eight passes in high-traffic areas, and four passes elsewhere. Where carpets have not been regularly and thoroughly cleaned, double the passes for three months.

The safest, easiest, and most effective deep-cleaning solution for area rugs is to have them rolled up and taken away for cleaning. With wall-to-wall carpeting, truck-mounted, hot-water extraction — or steam cleaning — works best. Cleaning rugs or carpets yourself with a rented extraction machine is fine as long as you don’t leave the carpet too wet and don’t use too much cleaner.

Key Concepts for Spot-Cleaning
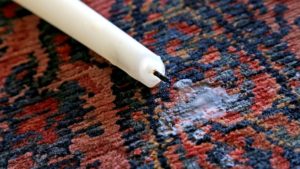
Blot
Trying to rub out a stain just pushes the spill into the pile and causes fibers to mat. Instead, blot up spills by covering the area with a clean towel or a thick pad of paper towels. Press down with the heel of your hand. Repeat using dry towels until all the liquid has been absorbed. If the spill is large, use a wet-dry vacuum (if available) to remove most of the material before blotting.

Soapy Water
Mix your own spot-cleaning solution by diluting a few drops of clear hand-dishwashing soap in water. (Laundry detergent is too alkaline, and creamy-looking hand-dishwashing soaps may leave a sticky residue.) Use less than 1/4 teaspoon per quart.

Rinse
To remove colored spills or spot-cleaning solutions, such as soapy water or vinegar, either mist the area with clean water, or blot it with a wet towel. Then blot area with a dry towel. Repeat these two steps until no more residue comes out. Do not rub, or the carpet fibers may become matted.

Out of the Carpet and Into the Air
The dust that collects in carpets may contribute to health problems — particularly asthma, the most common chronic disease among children. Many vacuums worsen the problem by sending that dust shooting into the air, but a relatively new breed uses HEPA (high efficiency particle arresting) filters to trap essentially all of it in the machine.

When the Carpet and Rug Institute, a trade group, tested vacuums’ effect on air quality, it found that just having a HEPA filter doesn’t necessarily mean the machine is a clean one. The beater brush may still stir up dirt that becomes airborne. To be awarded the group’s “green label” a vacuum cannot cause dust in the air to exceed 100 micrograms per cubic meter — ess than the amount of dust a person generates by scratching his head a few times.

How to Clean Your Carpets
Carpet Type: Synthetic 
Routine Care: Vacuuming — Remove grit with multiple passes in varying directions. Use the beater brush, set to the pile height. Change bag when one-half full because efficiency decreases after that. Liquid Spills — Clean promptly, using the blot technique described below. If the area discolors, there’s probably a sticky spill residue that has trapped soil. Clean by misting with warm water and blotting.
Deep Cleaning on Your Own: Professional steam cleaning works best on wall-to-wall carpeting and may be required by the warranty. If you want to do it yourself, vacuum thoroughly, then use an extraction machine from a rental company (supermarket models are less powerful). Test cleaning solution by pouring a few drops into a saucer and allowing to evaporate (a hair drier speeds the process). If the dried residue in the saucer remains sticky, switch cleaners. Use fans or air-conditioning to dry carpet. Area rugs can be cleaned using the same methods.

Carpet Type: Wool
Routine Cleaning: Vacuuming — Follow the instructions above, but avoid using a rotary brush on loop-pile (Berber) carpets; the yarn may fuzz. Instead, use a floor tool. Liquid Spills — Clean by misting with water and blotting, as for synthetic carpets. Never use ammonia or any other highly alkaline cleaner, which can damage wool.
Deep-Cleaning On Your Own: For both area rugs and wall-to-wall carpets, home cleaning is not recommended because wool fibers absorb more water than synthetic fibers do. This makes them hard to dry, and area carpets become very heavy and difficult to maneuver. Plus, a lot of the available cleaners are too alkaline. Many of today’s carpets, however — even Oriental-style ones — are actually made from synthetic fibers. To test for wool, snip a strand, and hold a lit match to it; burning wool smells like burned hair.

Carpet Type: Plant
Routine Cleaning: Vacumming — Use the same technique as for synthetic carpets. A beater brush is the best way to remove grit, which causes excessive wear on these carpets. Liquid Spills — Plant fibers are less stain-resistant than synthetics or wool, even if they have been treated with a water repellent, so blot spills promptly, following instructions below. Make sure damp areas dry quickly by using a fan or a hair drier (set on low heat).
Deep Cleaning On Your Own Manufacturers recommend the use of dry methods only. Leave that to a professional.


Removing Stains
Some commercial spot removers take off the protective coatings or break down dyes that are found on most carpets, but the remedies listed here do not. Note: Be sure to follow the instructions for spot-cleaning, “blot,” “soapy water,” and “rinse.”

Stain Type: Organic blood, berries, candy, chocolate, soft drinks/coffee, gravy, ice cream.
Cleaner: Hydrogen Peroxide bleaches these stains without breaking down carpet dyes.
Mix: Buy 3 percent solution at a drugstore and use full strength.
Technique: Scoop up solids with a spoon. Blot liquids. Rinse repeatedly. If stain persists, use soapy water, then rinse. Repeat. If improvement stops, dab on hydrogen peroxide. Wait one hour. Repeat as needed.
Mud: Allow spill to dry. Break off pieces and vacuum. Rinse with soapy water. Go to hydrogen peroxide if needed.

Stain Type: Alkaline cat urine, beer.
Cleaner: White Vinegar, a mild acid, neutralizes alkaline spills.
Mix: 1 cup white vinegar in 1 cup water.
Technique: Blot up spill and rinse. If stain persists, use soapy water, then rinse. Repeat until spot is gone; if stain persists, apply vinegar solution with a spray bottle or a saturated towel. Blot with a dry towel; rinse. If stain persists, repeat.

Stain Type: Acidic ketchup, cough syrup, mixed drinks, soy sauce, watercolor paint.
Cleaner: Ammonia, an alkali, neutralizes acidic spills.
Mix: 1 tablespoon in 1/2 cup water.
Note: Never use on wool; it can destroy the fibers. Instead, dilute spill with plain water.
Technique: Blot up liquid spills. Scrape off solids with a spoon or knife. Apply ammonia solution with a spray bottle or a saturated towel. Blot out excess with dry towel. Rinse. If stain persists, use soapy water and rinse. Repeat until improvement stops. If stain persists, use hydrogen peroxide. See instructions above.
Caution: Ammonia is toxic. Use good ventilation.

Stain Type: Oily/Waxy asphalt and tar, wax and crayon, metal polish, grease, hand lotion, ballpoint ink, makeup.
Cleaner: Rubbing Alcohol, a mild “dry-cleaner,” dissolves oily or waxy materials and is much safer than solvents in commercial spot removers.
Mix: Use full strength from bottle. Do not let it puddle; it may destroy the carpet backing.
Technique: Blot up or scrape off as much as possible (then, for wax, cover area with a brown paper towel, and transfer the wax by ironing on warm). Apply rubbing alcohol with a towel or cotton ball. For deep stains, blot with a clean towel, and repeat until towel remains clean. If spill is on the carpet tips, work material out by gently rubbing in one direction rather than blotting, which might drive the stain deeper. If stain persists, blot with soapy water and rinse; repeat. If needed, switch to hydrogen peroxide, as detailed above.

Stain Type: Chemically Reactive Acidic toilet-bowl cleaners, acne medication, lye-based drain cleaners, chlorine bleach, hair dye, iodine, insecticides, mustard with turmeric, plant fertilizers
Cleaner: Stain is permanent. For wall-to-wall carpet, call a professional to cut out the damaged area and patch with carpet from a closet or other hidden area. Alternatively, move furniture or set out pillows to cover stain. With area rugs, rotate so stain is in a less noticeable position.

Stain Type: Special Cases chewing gum, rust, nail polish
Technique: For chewing gum: Freeze with ice cubes. Break off bits, and pick them out. If that doesn’t work, go to a janitorial supply store for a spray that freezes gum instantly and allows you to chip it off. For rust: Apply soapy water. Rinse. Repeat until improvement stops. If stain persists, call a professional who will have access to more powerful cleaners. For nail polish: Dab on non-oily nail-polish remover with a cotton ball. Do not get it on carpet backing. Blot and repeat.